Tuesday, February 25, 2014

Reparatur von Kantenschäden an der Schalung von Deckentischen.

Deckentische sind besonderen Belastungen ausgesetzt. Die Logistik auf der Baustelle per Kran setzt insbesondere den Kanten der Schalhaut zu. Auch beim Abschalen kommt es immer wieder zu verletzungen am Rand der Tische zum Beispiel durch Verkanten.

Mit dem Emplica Plicafix 200 System, dem DB4XL Zylinderkopffräser und der Kantenschablone wird die dauerhafte Wiederherstellung einer scharfen und geraden Kante leicht gemacht.


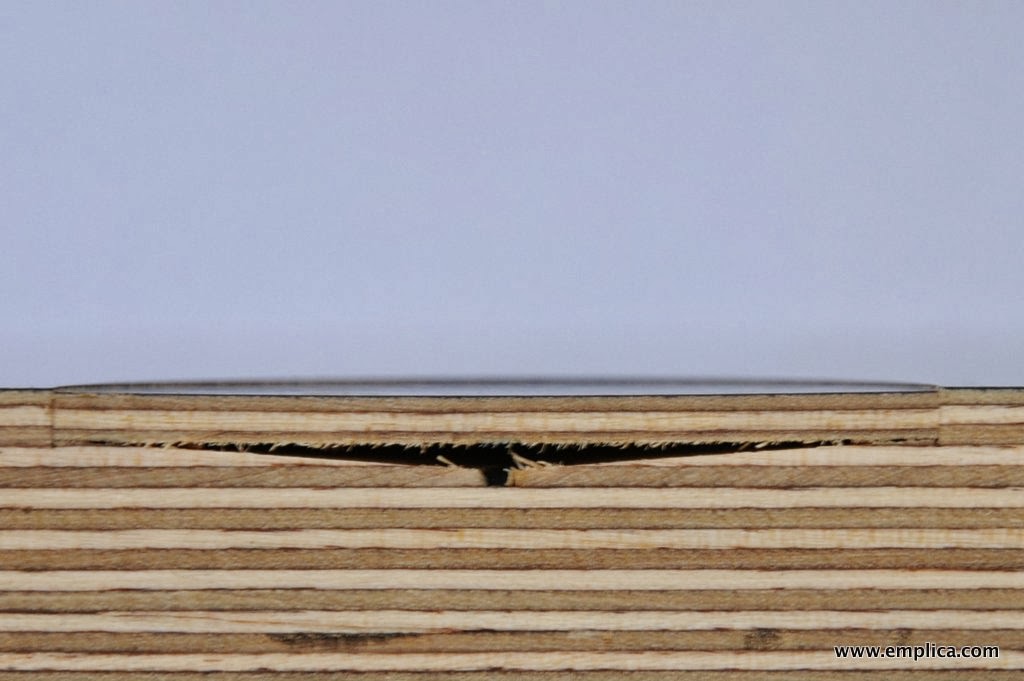
Deckentisch mit beschädigter Kante


Zuächst muss die Kante und die Schadstelle gereinigt werden. Auch Nägel, Schrauben  und Nieten müssen entfernt werden.

Am schnellsten geht das mit einer Topfbürste.


Nach der grosszügigen Behandlung mit der Bürste sieht die Kante nun schon deutlich besser aus. Auch Betonreste wurden restlos entfernt.


Nun kann die Kantenschablone angesetzt, und mit der Druckspindel an der Schalung arretiert werden.


Oberfräse ansetzen und einschalten, langsam und kontrolliert an der Schablone entlang von links nach rechts ziehen (da sich der Fräser im Uhrzeigersinn dreht).

Die Schablone ist so eingestellt, dass man genau am Rand entlang fräst.

Mittels Druckluft von Staub und Spänen befreien


Kleber (z.B. Emplica PUG PRO) sparsam auf die Kante sowie am vorderen Kantenrand auftragen

Plicafix 200 Reparaturstreifen mit einem Gummihammer vorsichtig einschlagen.


Durch das Fehlen der vorderen haltgebenden Seite sollte der Reparaturstreifen noch für ca 30 min fixiert werden. Dazu reicht eine Klemme wie im Bild aus.

mit einem Spachtel ausgehärtete Leimreste entfernen.


Kante versiegeln


Fertig


Der Film auf Youtube: http://youtu.be/4lemNH8_x2s


Bezug und weitere Informationen:


Tuesday, February 18, 2014

New Agents for North America

emplica is happy to announce that we now have distributors for the US and Canada


Our Agent in the US since february 2014:

For-Shor Company
Salt Lake City
Utah

Contact: Jim Snarr
Phone: (801) 487-1656
Fax: (801) 487-1650


Our Agent in Canada since January 2014:

Nadeau Specialites de Construction
1250 Chemin de la Coopérative, porte 9, Saint-Nicolas
Québec, Canada
G7A 1A1

Contact: Daniel Nadeau
Tel. Bureau: (418) 496 1125
Cel : (418) 952-6955 
Email: dnadeau@nadeausc.ca

Website: www.nadeausc.ca

Thursday, February 13, 2014

How to repair damaged edges on slab form tables

Slab tables are exposed to great strain during their use on site. The edges are usually the most vulnerable to damages from cranes and lifts or releasing.

With the  Emplica repair strips system in combination with DB4XL router bit and edge router guide, repairing these slab tables is very easy and simple.
Restoring a sharp, durable edge is done in a few quick steps, as shown in our pictorial below.
Slab table with damaged edge

First, clean the damaged edge and make sure there are no screws, nails and rivets left in the plywood.
Concrete residue will be removed during the cleaning process as well.


clean edge

Now put the router guide into place and fix with spindle

Use the router along the guide with slow, controlled movements.
Always drive from left to right, if the routerguide is facing you. (because of the router bit’s clock wise turn)

The router guide will make sure the groove is right at the edge.

blow away dust and clippings

Use Glue (e.g. Emplica PUG PRO) very frugally and only into the edge, not the full flat surface.

Use a rubber hammer to gently fix the repair strip.

You may want to use a clamp to put on some pressure for 15-30 mins.

remove excess glue after curing with a spatula


seal the newly repaired edge


finished


 watch the film on youtube: http://youtu.be/oXBH2giUgyc


Orders and more information


Monday, February 10, 2014

Getting the most out of plywood formwork, an article from Concrete Magazine

Happy that "Concrete"has published our article on how to save costs when working with plywood shutters and forms.


If you are interested in more Info about our products, please check our website: http://www.emplica.com

We also supply many training videos on our youtube channel: http://www.youtube.com/emplicaswitzerland

All our articles can be downloaded from our website:


Friday, January 31, 2014

Allgemeine Bauzeitung


Allgemeine Bauzeitung, Germany's weekly construction industry paper, about formwork repair on site with emplica repair kit.

Monday, January 20, 2014

how to keep the emplica drill bit in shape and clean with resin remover

Contact with concrete softens the phenolic film coating. By drilling through the film, the phenolic resins will start sticking tot he drill bit. This can effect the cutting performance negatively.

To clean your drill bit, a resin remover should be used regularly to keep the blades and spurs in good shape. See how our resin remover works wonders on a drill bit.

Emplica resin remover comes as a concentrated granulate that needs to be solved in water.


Use the drill bit’s original packaging as a container and pour in 1 tsp oft he granulate and add 100 ml of cold water.


sink the drill bit into the solution and let rest for 1 to 8 hrs.


The solution will get a brownish color, this indicates that it is working.

Rinse the drill bit with lots of cold water.


 dry the drill bit

 apply oil to avoid rusting

finished and ready for more drilling

How to set plywood repair plugs perfectly flush

Setting plywood repair plugs in such a way, that the concrete surface will later show no indentation requires a little understanding of physical properties of wood and water.

Processed wood directly from the factory has a moisture of ca. 8 per cent. Plywood panels, that have been used on site have a much higher moisture content of ca. 30-50 per cent.

After setting the repair plug into the panel, it will suck up moisture from the surrounding wood and swell. To avoid plugs from sticking up from the panel’s surface, one must set them a fraction of a millimetre deeper so it has room to swell. We recommend half the thickness of a fingernail.

Adjust depth stop of router to desired depth (we use a plug to see how deep we need to set the depth:


drill until depth stops

You can see the hole is declining towards the middle in the shape of a funnel. this gives room for excess glue to expand.


Apply glue to the edge


Set in plywood plug with a rubber hammer. As you can see in the picture below, it is a little "too deep". But as explained above, this is what we want. The plug will now suck up moisture from the panel and swell. it will be flush with the rest of the panel within a few hours or latest for the next pour.


You can download this guide as a pdf file from our website here:


Tuesday, October 29, 2013

Europe and Asia connected by tunnel - a historical project

Today, the Marmaray tunnel train was opened for public. For 2 million istanbul commuters crossing the bosporus daily this will hopefully come as a big relief. The existing bridges are usually jammed with traffic, not only during rush hours.

The tunnel has a length of just under 14 km and the new train line has a total of 75 km connecting the european with the asian side of istanbul.


Local newspaper Hürriyet (english) has an article about the tunnel.

here is a nice animation of the construction:


and here a video of the works.


and of course: discovery channel made a documentary.


more info on wikipedia

Congratulations Istanbul!


Monday, October 28, 2013

The human factor

Emplica engineers and manufactures products with lowest tolerance levels regarding quality.

The only way to keep quality at highest standards is to test and try the real product over and over again. No machine and no statistics can simulate reality.

Humans have the ability to see something and make instant decisions based on experience. Machines need to be programmed to do so. But what if the machine program is missing some info that has never been experienced and dealt with before?

Only the human brain is able to anticipate what impact a certain characteristic will have later on in the life of a product.
And this anticipation can happen within fractions of a second.

Usually, experience plays a big part in this decision making process, but also training and a good working environment that supports individual decisions and lets people be creative.

So what do we do at emplica? We make prototypes and ship them back and forth and test and test again until a final product evolves. The more complex the product, the more back and forth and the more testing and trials. Maybe even involving a client in this process to ensure a product that does what it is supposed to do and is better than a previous version.

Nothing beats human experience and creativity.

At emplica, every product we offer, has gone through these processes of prototyping, trials and improvements until we have decided that we can take responsibility for it.

Our starter kit has been designed to fulfill exactly its needs. We took away and added where necessary until we found there is nothing better.

Our drill bits have been designed to fulfill their purpose the best way possible. With multiple necessary, sometimes conflicting characteristics, it took many months for our drill bits to evolve into a final product.

Emplica's repair plugs and repair strips have been used by the thousands internally before a packaging was designed and the products being offered to our customers.

Why do we do this? We believe that quality and usability are the most important ingredients to a successful business in the long run.

Low prices almost certainly lead to disappointed customers, as quality suffers.


Friday, October 25, 2013

"Thats impossible!"


Never accept this as an answer if you want to achieve something better.

Since i started my company, i have been working on improvements of our products almost on a daily basis. This usually takes place after office and involves long evenings.

Often, i get to a point, where my engineering partners tell me that what i want is not possible without major disadvantages to existing characteristics. And almost just as often, i believe them. After all, they are the professionals right? They have studied this in university or college.

But one of the major advantages of an amateur is the fresh and unorthodox view at things.

Don't let them stop you just because they don't see a way. There is always a way.

Sometimes i have to use very rude methods to improve our products, using the completely "wrong" tools to work on them. Often, in a destructive way. But in the end, I get to the result I wanted and the design is right.

What happens then is this: I hand over my "piece of art" to the engineers and let them work on the fine tuning and have them make another prototype resembling what i wanted. And I love their reaction when it actually works!

Engineers tend to be stuck on their paths of thinking, especially, when they're not the user of their product. An outside view can change so many things.

Francis Picabia, a french writer in the 19th and 20th century once said:

“Our heads are round so our thoughts can change direction.”

If you stick to this, you will get where you want to get.


Check our products here:
http://www.emplica.com

Tuesday, October 15, 2013

Repair or resheet?

A quick guide for the formwork maintenance professional.

Concrete surface is a delicate matter and measured very individually. Following pictorial is in our opinion suitable for most forms, even when used for exposed concrete walls.
Some of our clients have even lowered the maximum amount of repairs allowed per panel and square meter or 10 square feet, to avoid any discussions with architects...
As a general rule, we recommend to NOT put more than 4 plugs per square meter / 10 square Foot. And NOT more than 10 plugs per Panel. If the panel is less than 1 sqm / 10sqft, then the maximum is obviously less than 4 plugs per panel…
We presume you know how to use our repair system. Badly set repair plugs are never accepted. You can always watch our tutorial videos on youtube: http://www.youtube.com/emplicaswitzerland
And there is another recommendation:
Please do not repair formwork that you have rented, unless you have clear instructions to do so by the owner of the formwork.
Repairing rented formwork often results in quarrel.
For obviuos reasons we cannot be held liable for any damages by the use of this guide
but lets get started:
Above panel has 8 damages, its ok to repair
Above panel has 16 damages, resheeting is recommended.
Above panel has 4 damages within 1 square meter / 10 square feet space. Repairing is ok
Above Panel has more than 4 damages on a space of 1 square meter / 10 square feet.

You can download this short guide as a pdf file here:
Please share if you like!

Monday, August 27, 2012

politicians and construction - does it work?

Taking Germany's two most recent and most "famous" public construction sites, one can get the impression that politicians should take their hands off any construction and leave it entirely to private professionals. The Hamburg Elbe Philharmonic Hall (wikipedia entry english and german) an the new Airport Berlin-Brandenburg (wikipedia: english and german) both are projects going pretty much wrong. In both cases, all estimates regarding costs, planning and finalization have been thrown over and changed massively.
Alone the Elbe Philharmonic Hall has doubled costs and construction time during construction. The Berlin Airport's construction disaster is in the german media almost every week with new delays and risen costs as well as chaotic conditions on site. Contractors have no idea what to do and where and when due to missing plans due to change of planning offices... Planned to open in june 2012, the opening date is now pushed to 2013....while costs are exploding and basic airport safety (fireproofing etc) rules have been neglected to great extends and need to be re-planned and built.

Do you have similar experiences about your tax money being spent by ambitious politicians? Or do you think prestigious objects like those two can never be built within time and cost frames?

How can public building be organized better?


Thursday, August 23, 2012

Plicafix 200 racing against Plicafix 40


request your Plicafix 200 starterkit now here: www.emplica.com

Wednesday, August 22, 2012

Plicafix 200 versatile formwork repair system

not only is it possible to repair damages up to 20 cm in lenght, but you can even repair longer scratches and scratches that curve, as can be seen in following image:


the repair process is just as simple as with a single repair strip. once, the first strip is set, move the template and set the second strip.


not only incredibly fast, also much better looking than the small round classic patches overlay technique:

images of the concrete surface with both methods coming up soon.

request your offer now: www.emplica.com


fordern Sie ihr Angebot für das Plicafix 200 System jetzt an: www.emplica.com


Thursday, August 9, 2012

Allgemeine Bauzeitung about the advantages of Plicafix 200

German weekly construction paper "Allgemeine Bauzeitung" (link) has published an article about the new repair system for long scratches in plywood formwork. Download the article here (ABZ25052012).

Allgemeine Bauzeitung 25/05/2012